
Lightning Fast Turnaround!
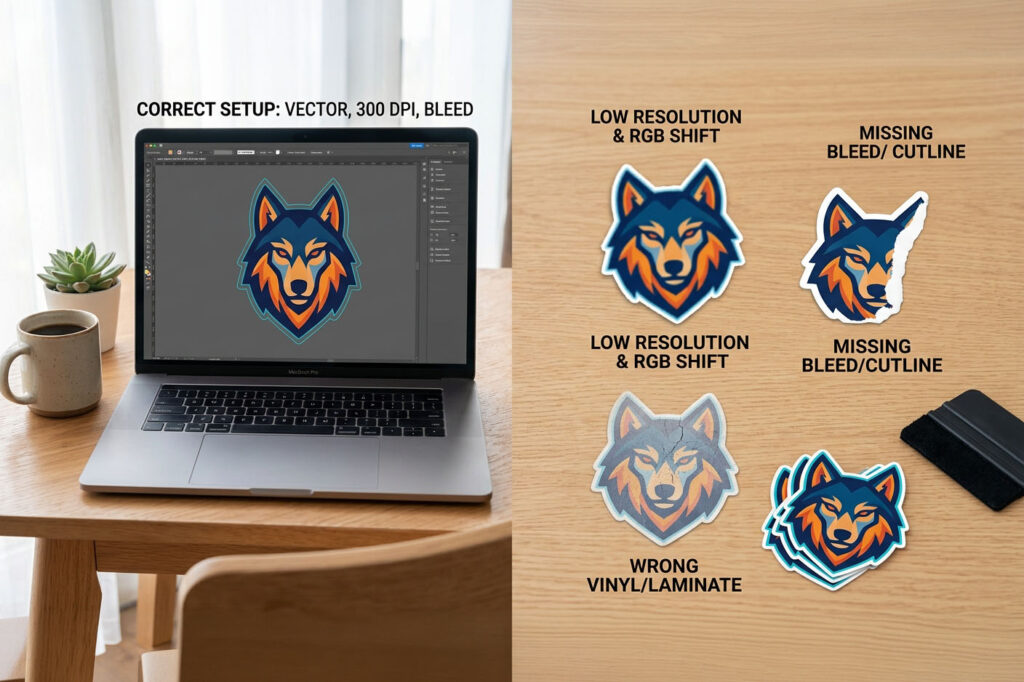
Printing custom vinyl decals or car stickers looks simple on the surface, but small errors in artwork preparation or material selection lead to severe quality issues. Bad print runs waste physical inventory, delay marketing campaigns, and damage brand perception when applied to fleet vehicles or personal rides.
When a graphics file lacks proper bleed or resolution, the physical sticker shows unwanted white borders, blurry lettering, or incorrect color shifts. Picking the wrong vinyl grade means stickers peel away after the first automatic car wash or fade after a few weeks under direct sunlight.
Fixing these issues after production doubles your total cost. Correcting artwork settings, selecting durable laminates, and aligning your adhesive specifications upfront prevents unexpected reprinting costs and keeps your project on schedule.
Vector graphics scale to any dimension without losing crisp lines. Raster images consist of fixed pixels. Scaling a low-resolution JPEG or PNG file up to fit a rear window or bumper stretches those pixels, creating blurry edges and jagged text.
Always submit print files created in vector formats like AI, EPS, or vector PDF. If you must use raster graphics, set the image resolution to at least 300 DPI (dots per inch) at actual print size. A high-resolution raster image looks sharp on a smartphone screen, but expanding it from two inches to eight inches drops the effective resolution down to unacceptable levels.
Check raster graphics at 100% scale in your graphic design software before exporting. If pixelation appears around small text or detailed logos on your monitor, those flaws will transfer directly to the printed vinyl.
Stickers require precise cutting lines to guide digital plotters or die-cut machines. A common mistake involves placing text or vital graphic elements too close to the boundary line, or failing to extend background colors past the final edge.
Bleed represents the background image area that extends beyond the trim line. Physical cutting blades can shift slightly during high-speed production runs. Without a 0.125-inch bleed margin, a slight blade drift leaves a thin white unprinted strip along one edge of your custom sticker.
Keep all vital design elements within a safe zone at least 0.125 inches inside the cut line. This buffer prevents text, contact details, or border outlines from getting sliced off during the final trimming process.
Monitors, phones, and digital screens create visuals using RGB (Red, Green, Blue) light emissions. Industrial inkjet printers use CMYK (Cyan, Magenta, Yellow, Key/Black) physical inks. Designing your artwork in RGB creates realistic expectations that digital printers cannot match.
Bright neon greens, electric blues, and vibrant pinks look brilliant on a backlit computer screen, but physical CMYK inks lack the gamut range to replicate those exact luminous shades. Converting an RGB file to CMYK right before printing often causes dramatic color shifts, turning bright teal into muted slate gray.
Set your color palette to CMYK mode at the start of your design process. Use Pantone matching codes for exact brand colors so your printer can calibrate ink densities to hit those precise color values.
Not all vinyl films perform equally in outdoor environments. Monomeric vinyl works fine for short-term indoor promotional stickers, but shrinks, cracks, and peels quickly when exposed to automotive heat and weather.
Polymeric vinyl or cast vinyl offers long-term durability on vehicle surfaces. Cast vinyl conforms easily around body curves, door handles, and rivets without pulling away over time. Monomeric films resist stretching and pull back from deep contours, creating air bubbles and premature adhesive failure.
Always apply a clear protective overlaminate to printed vehicle graphics. Laminate films shield physical inks against UV fading, road salt, abrasion, and harsh detergents used in automatic car washes. Unlaminated printed stickers lose color density within months of exposure.
Adhesives come in low-tack removable, high-tack permanent, and bubble-free air-egress options. Matching the wrong adhesive profile to your target surface leads to application failures or paint damage during removal.
| Adhesive Type | Surface Target | Primary Benefit |
| Standard Permanent | Metal body panels, painted surfaces | High bond strength, weather resistance |
| Removable Vinyl | Glass windows, temporary vehicle promos | Easy removal without leaving residue |
| Air-Egress Vinyl | Large flat or curved body panels | Channels air out to prevent bubbles |
For large vehicle decals or full door wraps, select air-egress vinyl. Microscopic channels in the adhesive allow trapped air to escape easily during application with a felt squeegee. Using standard permanent vinyl on large surfaces increases the risk of trapped air pockets, forcing installers to puncture the vinyl manually.
Consider removal needs before ordering. If your stickers run for temporary seasonal promotions, permanent adhesives leave heavy residue on vehicle glass that requires chemical solvents and scraper blades to clear away.
Following a structured pre-press routine catches file errors before production begins. Run through these exact steps to prepare your file for clean printing results:
Vector file formats like AI, EPS, or vector-based PDF yield the sharpest results. These formats allow printers to scale graphics to any size without losing crisp line definitions.
High-quality cast vinyl with a protective UV laminate lasts 3 to 5 years outdoors. Unlaminated or monomeric vinyl stickers usually fade or crack within 6 to 12 months.
Die-cut stickers cut completely through both the vinyl layer and the paper backing material. Kiss-cut stickers cut through the vinyl top layer while leaving the larger backing paper intact.
Laminated vinyl car stickers easily withstand standard automatic car washes after the adhesive cures fully. Wait at least 48 hours after application before running the vehicle through a car wash.
Monitors emit light using RGB color modes, making colors appear brighter than physical ink on vinyl. Converting files to CMYK before printing provides a true representation of final physical colors.
Avoiding basic artwork errors and picking proper vinyl materials keeps sticker projects on budget. Double-checking color settings, adding bleed margins, and specifying UV-resistant laminates guarantees your graphics look sharp on any vehicle surface. Take time to inspect your artwork files at full scale before submitting orders to production.
To move forward with clean artwork and durable materials, review your files against this checklist before sending your order to production at The Bumper Sticker.
|
Uploaded
Failed
|
 |