Lightning Fast Turnaround!
Bubbles under bumper stickers are like typos in a love letter.
They completely ruin what should have been perfect. You carefully selected or designed the ideal sticker. You found the perfect spot on your car, laptop, or storefront window. Then somehow, despite your best efforts, you ended up with air pockets that make your sticker look like it has chicken pox.
Those bubbles aren’t just cosmetic problems either. Each air pocket represents a weak point where moisture can penetrate, adhesive can fail, and edges can start lifting. What begins as a small bubble often becomes a peeling corner, then eventually a completely failed sticker that either falls off or needs to be scraped away in frustrating little pieces.
The Bumper Sticker has been producing San Antonio bumper stickers for decades, and we’ve taught thousands of customers the professional techniques that guarantee bubble free application every single time. Whether you’re applying one personal sticker or branded decals across an entire fleet, these methods work.
Understanding bubble formation helps prevent it. Air gets trapped when the sticker adhesive makes contact with the surface before you’re ready for permanent placement. Once adhesive touches down, that air has nowhere to escape except by creating a pocket.
Think about it like laying down a piece of tape. If you let the middle touch first while the ends are still up, you’ve created a bridge with air underneath. Now multiply that effect across an entire bumper sticker where any point might make premature contact, and you understand why so many people end up with bubble disasters.
Surface contaminants make everything worse. Dust particles create tiny tent poles that hold the sticker up. Oil residues prevent proper adhesion in spots, creating weak zones where bubbles form later. Even microscopic dirt creates enough interference to trap air during application.
Temperature fluctuations cause bubbles after application too. Apply a sticker to a cold surface, then watch bubbles appear as everything warms up and air expands. Or apply in blazing heat where the adhesive gets too soft and doesn’t maintain proper surface tension.
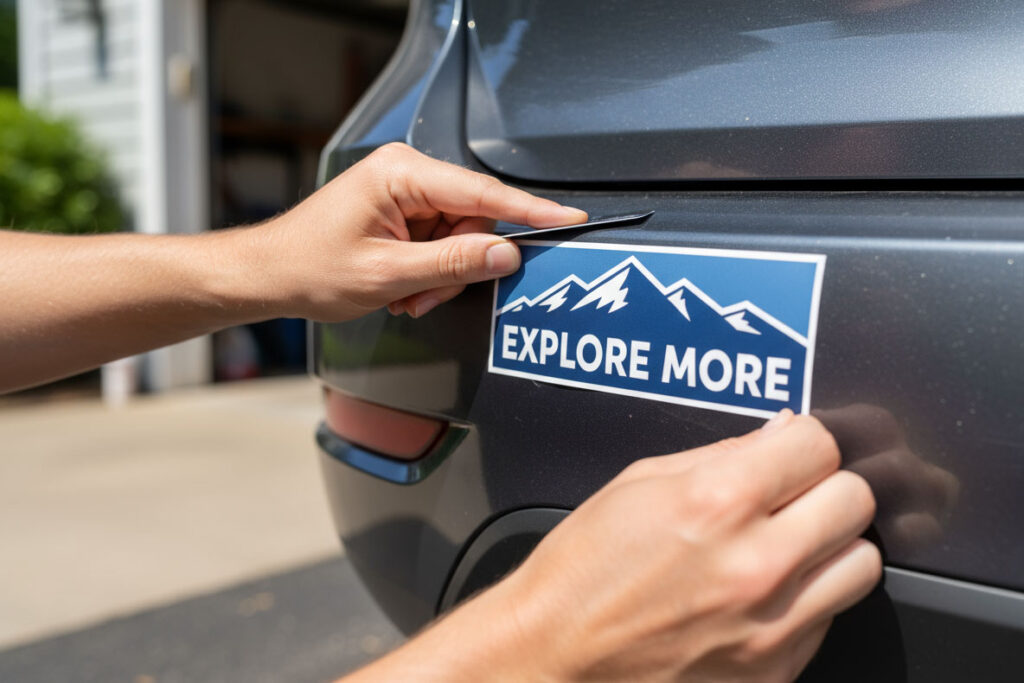
The dry method works best for smaller stickers under 6 inches and situations where you need immediate, permanent adhesion. This is what most people attempt naturally, but without proper technique, it’s also how most bubbles happen.
Clean your surface with isopropyl alcohol first. Not window cleaner, not soap and water, but actual 70% or higher isopropyl alcohol. This removes oils, dust, and residues that cause bubbles and adhesion failures. Wipe once to clean, then again with a dry cloth to remove any moisture.
Create a hinge point using masking tape. Position your sticker exactly where you want it with the backing still on. Place a strip of masking tape across the top edge, creating a hinge. Now you can fold the sticker up, remove the backing, and lower it into position with control.
Here’s the crucial part: start from the hinge and work downward using a squeegee or credit card wrapped in soft cloth. Apply pressure in overlapping strokes from center outward, never allowing the unapplied portion to touch prematurely. The tape hinge keeps everything aligned while you maintain complete control.
Work in sections for larger stickers. Don’t try to do the whole thing at once. Lower an inch or two, squeegee thoroughly, then lower the next section. This methodical approach takes slightly longer but eliminates bubble risk.
Professional installers often prefer the wet method for larger stickers because it allows repositioning and naturally prevents bubbles. The secret is using the right solution in the right amount.
Mix a solution of water with just a tiny drop of dish soap. We’re talking one drop per spray bottle, not a squeeze. Too much soap prevents proper adhesion. Some people use commercial application fluids, but the homemade solution works perfectly when mixed correctly.
Spray the surface liberally with your solution. This is where people get nervous, but trust the process. The water creates a barrier that temporarily prevents the adhesive from grabbing, giving you time to position perfectly.
Remove the backing and spray the adhesive side of the sticker too. Yes, directly on the sticky part. This feels wrong but is absolutely essential for the wet method to work.
Position your sticker on the wet surface. It should float into position easily, allowing you to slide it around until alignment is perfect. No commitment yet, just get it exactly where you want it.
Now squeegee from the center outward with firm, overlapping strokes. You’re pushing the solution out from under the sticker. Start dead center and work systematically outward. The solution carries any air bubbles with it as it escapes from the edges.
The waiting game begins. Let the sticker dry completely before considering it done. Depending on temperature and humidity, this takes 24 to 48 hours. During this time, the remaining moisture evaporates through the vinyl, and the adhesive activates fully.
Professional results require proper tools, but nothing expensive or exotic.
A quality squeegee changes everything. The felt edge versions prevent scratching while providing firm, even pressure. Credit cards work in a pinch but wrap them in microfiber cloth to prevent damage. The goal is consistent pressure across a wide area.
Heat guns or hair dryers help with curved surfaces and cold weather application. Gentle warming makes vinyl more pliable and adhesive more active. Don’t overdo it; you’re warming, not cooking.
Pin tools save stickers when bubbles do occur. A small pin can pop bubbles, allowing you to press out air without damage. This is emergency treatment, not standard procedure, but it’s good to have the option.
Measuring tape and levels ensure professional placement. Eyeballing straightness usually results in crooked stickers that bug you forever. Take 30 seconds to measure and mark reference points.
Curved surfaces like bumpers require modified techniques. Apply the center first, then work outward in small sections, allowing the vinyl to conform naturally. Don’t stretch; let the material find its shape.
Textured surfaces need extra attention and possibly different materials. Standard vinyl might not conform to heavy texture. Consider using high tack adhesive stickers designed for rough surfaces.
Cold weather application demands patience. Warm the surface and sticker to at least 60 degrees Fahrenheit. Cold adhesive doesn’t flow properly, virtually guaranteeing bubbles and poor adhesion.
Multiple sticker arrangements benefit from paper templates. Tape paper in the desired pattern, mark positions, then replace paper with actual stickers. This prevents waste and ensures professional spacing.
Small bubbles often disappear on their own within 48 hours as adhesive settles and air escapes through the vinyl. For persistent bubbles, use a pin to create a tiny hole at one edge of the bubble, then press the air out toward the hole. Work slowly to avoid creasing. For large bubbles, you might need to carefully lift that section and reapply, though this risks damaging the sticker or reducing adhesion strength.
The sweet spot is between 60- and 80-degrees Fahrenheit for both the surface and air temperature. Below 50 degrees, adhesive becomes too stiff to flow properly into surface texture. Above 90 degrees, adhesive gets too soft and grabby, making positioning difficult. If you must apply in extreme temperatures, the wet method provides more working time and forgiveness.
Wait at least 72 hours before any water exposure, and a full week before high pressure washing. The adhesive needs time to fully cure and create permanent bonds. Early water exposure, especially with pressure or hot water, can penetrate edges and cause premature failure. Hand washing is safer than automatic car washes for the first month.
The wet method works great for vinyl stickers but should be avoided with paper-based stickers or those with non-waterproof adhesives. Most bumper stickers from The Bumper Sticker are vinyl and handle wet applications perfectly. If you’re unsure, test a small corner first or contact the manufacturer. Reflective and metallic stickers usually work fine with wet application, but specialty materials might have specific requirements.
Delayed bubbles usually result from temperature changes causing expansion, moisture penetration through compromised edges, or adhesive failure in specific spots. Sometimes contaminants on the surface weren’t visible during application but prevent proper bonding. These delayed bubbles are harder to fix than immediate ones, often requiring partial removal and reapplication of the affected area.
Perfect bumper sticker application is a skill anyone can master with the right technique and tools. Whether you’re applying a single personal statement sticker or rolling out a fleet branding campaign, these methods guarantee professional results.
The Bumper Sticker provides detailed application instructions with every order because we want your custom stickers to look perfect and last for years. Quality stickers deserve quality application and San Antonio sticker printing. Take your time, use the right method for your situation, and enjoy bubble free results that make your message shine—especially when you choose custom stickers in San Antonio TX designed for long-lasting performance.
|
Uploaded
Failed
|
 |